Overview
Custom runtimes allow you to upload your own Python runtime environment to run scripts in Cloud with full control over dependencies and Python versions. This gives you flexibility beyond the standard python3.9 and python3.13 runtimes, allowing you to bundle specific package versions, system libraries, or even custom Python builds.
💡Note
Using custom runtimes
Uploading a runtime
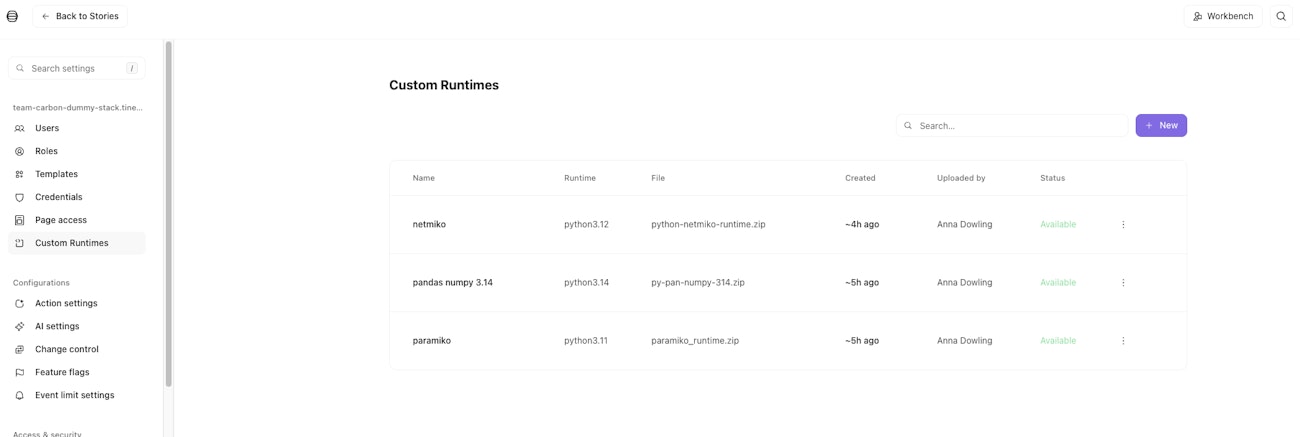
Navigate to Settings > Custom runtimes in your tenant if you are a tenant or team admin(users with
STORY_MANAGEpermission).Click Add runtime and upload your ZIP file.
Select a primary team that will own the runtime.
Optionally grant access to other teams via the Access tab.
Click Add to submit.
While uploading, the status will show as Creating.... When extraction completes, the status changes to Available.
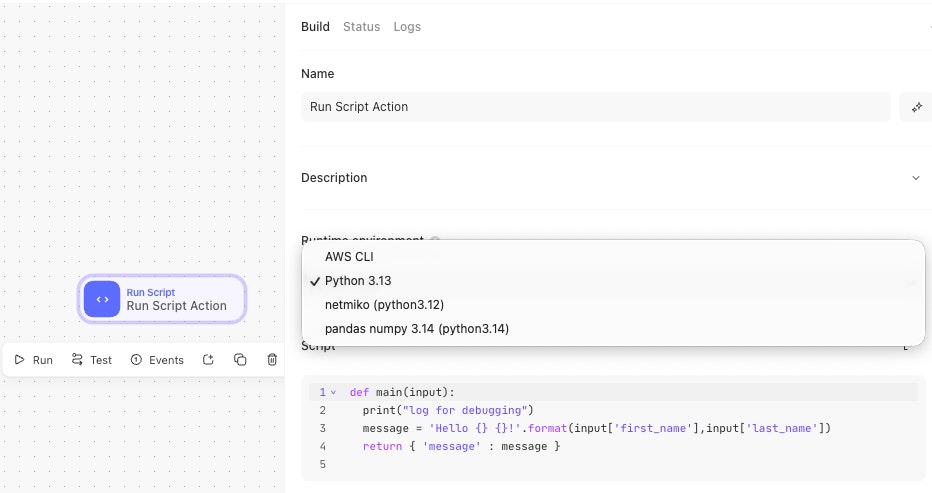
Using a runtime in Run Script
Once a runtime is available, it appears in the Runtime dropdown on Run Script actions for teams with access. Select your custom runtime and write your script as normal.
File paths in scripts
Custom runtimes are extracted to Amazon EFS (Elastic File System), a network file system that persists your runtime files. The bootstrap script sets the working directory to your extracted runtime before executing your script. This means you can include additional files in your ZIP (configuration files, certificates, data files) and reference them with relative paths. Example:
✅ 'config_file': 'my-config-file.py'
❌ 'config_file': '/my-config-file.py'
Building your custom runtime
Runtime environment
Custom runtimes run on provided.al2023, which uses Amazon Linux 2023 as the base operating system. Lambda functions use x86_64 architecture.
Important: Build on Amazon Linux 2023 (or compatible) to match Lambda's runtime. Building on Debian/Ubuntu may cause GLIBC version mismatches.
Runtime structure
Your ZIP should contain:
my-runtime.zip
├── bin/
│   └── python3 (or python3.12, python3.13, etc.)
├── lib/
│   └── python3.12/
│       └── site-packages/ (your packages)
└── handler (optional - see Custom handlers)
Building with Docker
Using the following Dockerfile as an example:
# Use Amazon Linux 2023 base image to match Lambda runtime
FROM --platform=linux/amd64 amazonlinux:2023 AS builder

# Install build dependencies
RUN dnf update -y && \
    dnf groupinstall -y "Development Tools" && \
    dnf install -y wget openssl-devel zip && \
    dnf clean all

# Download and compile Python 3.12
WORKDIR /tmp
RUN wget https://www.python.org/ftp/python/3.12.7/Python-3.12.7.tar.xz && \
    tar -xf Python-3.12.7.tar.xz && \
    cd Python-3.12.7 && \
    ./configure --prefix=/opt/python-runtime && \
    make -j$(nproc) && \
    make install

# Create runtime structure
RUN mkdir -p /opt/runtime && \
    cp -r /opt/python-runtime/* /opt/runtime/

# Install packages
RUN /opt/runtime/bin/python3 -m pip install --upgrade pip && \
    /opt/runtime/bin/python3 -m pip install netmiko==4.2.0

# Create ZIP
WORKDIR /opt/runtime
RUN zip -r /tmp/python-netmiko-runtime.zip .
Build and extract the ZIP:
# Build the image
docker build --platform linux/amd64 -f Dockerfile -t python-netmiko-runtime .

# Extract the ZIP
docker rm -f temp 2>/dev/null || true
docker create --name temp python-netmiko-runtime
docker cp temp:/tmp/python-netmiko-runtime.zip ./python-netmiko-runtime.zip
docker rm temp
Validating your runtime
Validate your runtime ZIP locally before uploading to catch common issues early:
docker run --rm \
  --platform linux/amd64 \
  -v $(pwd):/runtime \
  -w /runtime \
  amazonlinux:2023 \
  /bin/bash -c "dnf install -y unzip > /dev/null 2>&1 && \
    unzip -q python-netmiko-runtime.zip -d /tmp/test && \
    export LD_LIBRARY_PATH=/tmp/test/lib:\$LD_LIBRARY_PATH && \
    /tmp/test/bin/python3 -c 'import sys; print(f\"Python {sys.version}\")' && \
    /tmp/test/bin/python3 -c 'import encodings; print(\"✓ encodings OK\")' && \
    /tmp/test/bin/python3 -c 'import netmiko; print(f\"✓ netmiko {netmiko.__version__} OK\")' && \
    echo '✅ All validation tests passed!'"
This runs in a Lambda-like environment, so passing these checks indicates your runtime should work in Lambda.
Building with the custom-runtime-builder tool
Note: This is an unofficial tool and is not actively maintained by Tines. Use at your own discretion.
A helper tool for creating, building, and testing custom runtimes without writing Dockerfiles. Requires Docker with linux/amd64 support and bash.
# Create a new environment
./build-env.sh new my-project

# Edit environments/my-project/config.env to set Python version
# Edit environments/my-project/requirements.txt to add dependencies

# Build and test
./build-env.sh build my-project
./build-env.sh test my-project
The output ZIP at builds/my-project-runtime.zip can be uploaded via Settings > Custom runtimes. Run ./build-env.sh list to see available environments, or ./build-env.sh info <env> for details.
How custom runtimes execute in Cloud
Handler
The handler executes your user script. It receives the event {"user_script": "...", "input": {...}}, extracts and executes the main(input) function, and returns {"output": <result>}.By default, Tines generates a handler that includes:
AST validation (ensures scripts define main())
Restricted built-ins for security
Error handling with structured responses
stdout/stderr capture and logging
Bootstrap
The bootstrap script is the Lambda entry point. It:
Mounts your runtime from EFS
Finds the Python executable in your runtime's bin/ directory
Validates the runtime
Executes the handler
Communicates with the Lambda Runtime API
Custom handlers
You can provide your own handler script instead of using the default.
Use cases
Different script structure (class-based handlers, multiple entry points)
Custom logging, metrics, or telemetry
Framework integration (async execution, middleware)
Multi-file script support
Custom security restrictions
One-time setup/initialization
Providing a custom handler
Place a file named handler (or bin/handler) in your runtime ZIP. The bootstrap script checks for handlers in this order:
handler (root of your runtime)
bin/handler (fallback location)
Generated handler (if none found)
Handler requirements
Your custom handler must:
Be executable (
chmod +x handler)Read JSON from stdin:
{"user_script": "...", "input": {...}}Write JSON to stdout:
{"output": <result>}Handle errors by returning structured error responses
Example custom handler:
#!/usr/bin/env python3
import json
import sys
import os

# One-time setup (runs on first invocation per container)
SETUP_FLAG = "/tmp/.handler_setup_done"
if not os.path.exists(SETUP_FLAG):
    os.environ["MY_API_ENDPOINT"] = "https://api.example.com"
    open(SETUP_FLAG, "w").close()

# Read event from stdin
event = json.load(sys.stdin)
user_script = event.get("user_script", "")
input_data = event.get("input", {})

# Execute user script
exec(user_script)
result = main(input_data)

# Return JSON output
print(json.dumps({"output": result}))
sys.stdout.flush()
VPC access and networking
Custom runtime Lambda functions run in a VPC (required for EFS). To connect to databases, APIs, or on-premises resources, you can configure network access using egress IP addresses.
Getting egress IP addresses
Call the
/infoAPI endpoint: GEThttps://your-tenant.tines.com/infoFind
lambda_egress_ipsin the responseAllowlist these IPs in your firewall or security rules
Set Networking: Dedicated on your Run Script action to use these IPs
curl https://your-tenant.tines.com/info
# Response includes: "lambda_egress_ips": ["52.50.126.105", "99.81.187.154"]
Note: Egress IPs are static and typically include 2 IPs (one per Availability Zone). On multi-tenant stacks, these IPs are shared with other customers unless you are using a dedicated tenant.
Best practices
Validate locally before uploading. Use the validation command to catch issues before they cause failed action runs.
Keep runtimes minimal. Only include packages you need. Smaller runtimes upload and extract faster.
Pin package versions. Specify exact versions (e.g., netmiko==4.2.0) for reproducible builds.
Build on Amazon Linux 2023. This ensures GLIBC compatibility with the Lambda runtime.
Test with the same architecture. Build and test with --platform linux/amd64 to match Lambda's x86_64 architecture.