


Google provides an array of APIs for all manner of its services. When we think of Google’s user productivity and collaboration tools for business, we think of G Suite. G Suite is now called Google Workspace, but the tools and APIs we know and love are the same. Google Admin allows for excellent visibility into users’ actions with its Security, Report, and Alert Center pages, but how do you extend that functionality to build your own custom workflows for specific types of events? Previously we’ve looked at interacting with G Suite APIs here , but now let’s focus on subscribing to “push notifications” via webhooks.
Let’s look at how to subscribe to a G Suite endpoint and receive webhooks for user account events. This will let us build custom workflows and tailored security responses for various scenarios.

G Suite / Google Workspace automation and APIs
When diving into any API, the first concerns tend to be:
Where and what sort of documentation does the API have?
What specific endpoint(s) can I access?
How do I authenticate?
Are there any prerequisites, limitations, or ‘gotchas’?
What tooling can I use to quickly prototype and test?
G Suite / Google Workspace API documentation
Main G Suite / Google Workspace API documentation hub here.
REST API / scripting resources here
Google APIs explorer here.
G Suite / Google Workspace Admin SDK for Reports API here.
G Suite / Google Workspace reports endpoint(s)
As we will be using the Reports API, the endpoint we will interact with most is the following to which we will be appending the “watch” command to create a “channel” or subscription to a specific event type.
G Suite / Google Workspace API authentication
API credentials are set up on a per-project basis. This means you are required to create a specific project name before creating API credentials. This is performed here: https://console.developers.google.com/ with a subsequent visit to https://console.developers.google.com/apis/credentials once you have created a project.
There are three critical steps here to ensure an efficient and successful outcome in terms of authentication.
Note: We will use OAuth 2.0 to authenticate to Google’s APIs; however, we will use a “service account” and 2-legged server-to-server authentication (rather than a 3-legged one involving any interaction with a user). Additionally, we will request an OAuth grant-type of jwt-bearer, which will produce a JWT token. We will then use this token as our OAuth access token (in the header of our API calls). This means our automation will not need to engage with any refresh token requests or interactive authorizations. An example diagram is provided by Google here. Now, let’s complete the three steps required to support a successful authentication and authorization:
Information on how to authenticate into Google Workspace can be found here. To get up and running with the reports API, you must use these scopes instead of those mentioned in the post.
https://www.googleapis.com/auth/admin.reports.audit.readonly,
https://www.googleapis.com/auth/admin.reports.usage.readonly
G Suite / Google Workspace reports API limitations
You must verify the domain you wish to send webhooks to in Google Search Console.
You must also renew your desired push notification subscriptions, as they have an expiration time. This expiration is different per endpoint or service (the Reports API push expiration is 6 hours). This means we will also have to automate the re-subscription to our specific event type for our “channel.”
Additionally, there are lag times on the freshness of data. The Reports API ‘User Accounts’ lags by a few minutes, and while some APIs are real-time, others may take 1-3 days, so be warned! The metrics for data retention and lag are here.
Tooling
cURL on the CLI is one way to test our JWT token request and subsequent calls. Postman has a nicer fully-fledged GUI, and of course, you could use your preferred language of choice, but today we will be using Tines. Tines has native support for JWT credentials (allowing us to generate and use tokens with a single and straightforward step from anywhere within our workflow), and it also enables rapid, reusable, and shareable workflows.
Note: You can access the always free Tines' Community Edition here.
Quick setup up
Step 1. Creating JWT credentials
In Tines, go to “Credentials” and then “+ New Credentials” to create a new credential with the below details:
Type: JWT
Credential Name: Google
Algorithm: RSA256
Payload:
{
 "iss":"donal-blog-gsuite-apis@speedy-backbone-292412.iam.gserviceaccount.com",
 "sub":"donal@tines.io",
"scope":"https://www.googleapis.com/auth/admin.reports.audit.readonly https://www.googleapis.com/auth/admin.reports.usage.readonly",
 "aud":"https://www.googleapis.com/oauth2/v4/token"
}
Auto-generate ‘iat’ (Issued At) & ‘exp’ (Expiration Time) claims: ticked/yes
Private key: <paste the="" contents="" of="" private_key="" beginning="" with="" ‘-----begin="" private="" key-----’="" and="" ending="" ‘-----end="" key-----\n’=""></paste>
Share credential: <empty></empty>
Note: Ensure you replace the “payload” iss field with your service account’s email address and replace the subfield with your email address.
Step 2. Testing the JWT credentials
In Tines, create a new HTTP credential type.
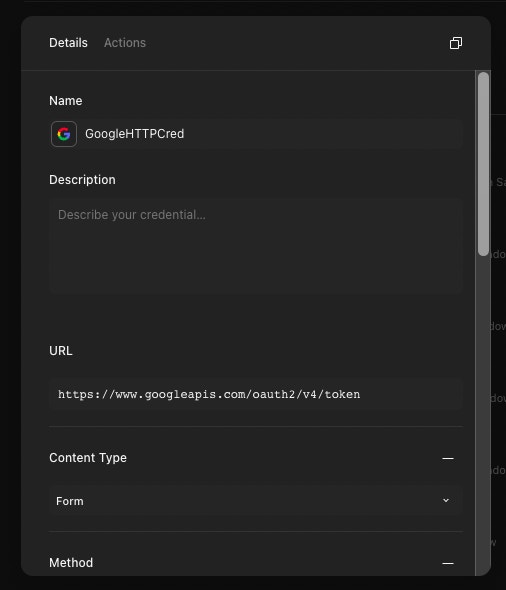
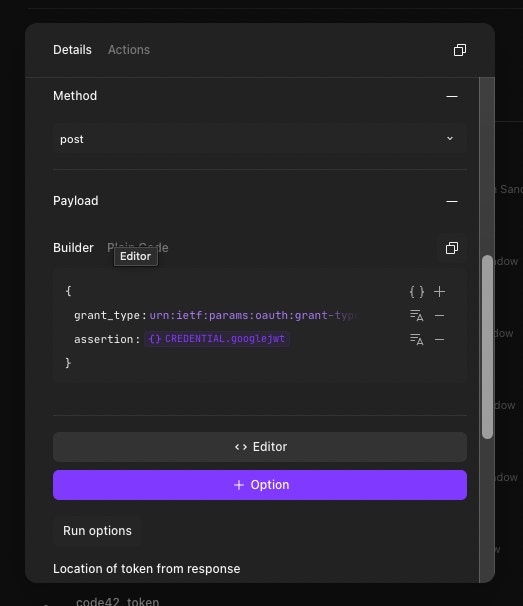
Here is the JSON for the credential:
{
"url": "https://www.googleapis.com/oauth2/v4/token",
"content_type": "form",
"method": "post",
"payload": {
"grant_type": "urn:ietf:params:oauth:grant-type:jwt-bearer",
"assertion": "<<CREDENTIAL.google>>"
}
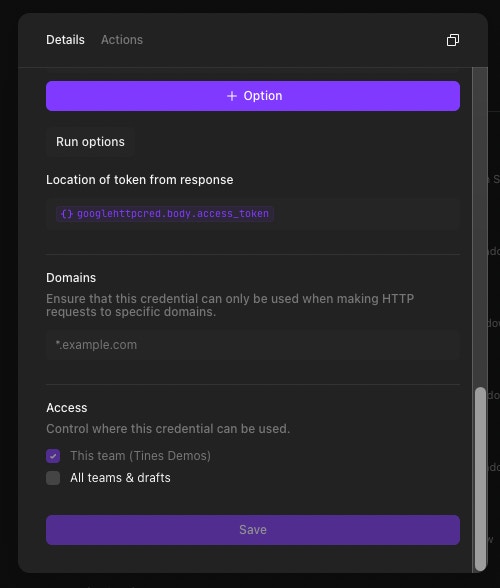
}Now click the Action, and when you run “▷” it, you should get a token in the response (visible from the right-hand side panel under “Events” when you hover over the Event ID and click “Show”.
"access_token": "ya29.a0AfH6SMCaj8sQUMCb1TsdqX32mujhRr0f4UouWC-t9VLdqCSwZwIdIG83YAoOKkNWSQ5t9UnAt5jfELpXfBCowLGl0w94zIvOpIR21Zsa7i3lTpGPX6s1cMQJxoAIT97IG6DvvLvI3V4VjQ45PsHcjRt2Ivp51c2HT0PLeU2C2DHM8zIeNUMTYFojT0VeX4bgKPX1QTjqvzYDoZ7fcnwJ",Putting it all together
We now have an active subscription to the Reports API user_account events, and other than informational sync messages, we will receive all the data we need in the subsequent webhooks. It is from this entry point (our previous Webhook Action) that we can now make decisions about what to do next, be it for alerts, sending interactive user messages, or even to trigger other Actions or applications to perform related tasks for us. We can even chain our Story workflows together to make them more modular and easily reusable.
Let’s add some more Actions below to our WebHook Action and build a small but extensible Story workflow that acts on the type of notification content we receive.
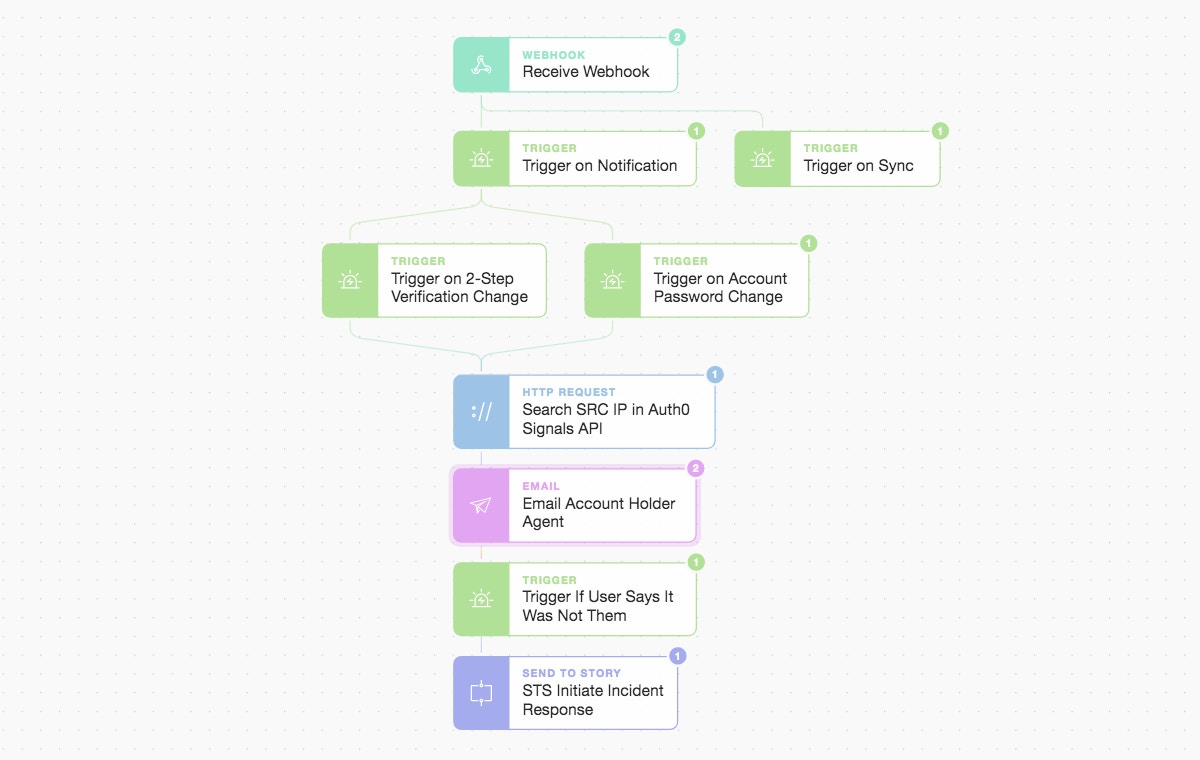
Tines: From webhook to triggers and Actions, including IP checks, email, and modular Stories.
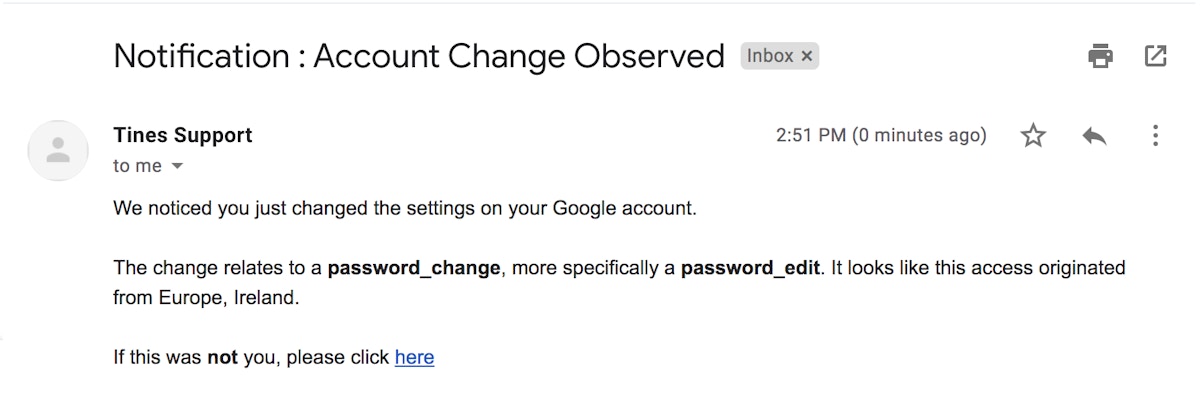
Initially, we only see the “sync” message from our “watch” request, but things get more interesting once someone changes their password, disables multi-factor authentication, updates their recovery details, or changes their Advanced Protection state. Let’s do a quick password change and see what happens.
The password change created an event and sent a notification to our Webhook Action. We can see the contents of this webhook below (including the fields we make decisions on, such as the actor involved and any specific events at play).
{
  "receive_webhook": {
    "body": {
      "kind": "admin#reports#activity",
      "id": {
        "time": "2020-10-19T13:28:36.696Z",
        "uniqueQualifier": "2247204315564511884",
        "applicationName": "user_accounts",
        "customerId": "C02sz61y7"
      },
      "etag": "\"UCgH-M2qpDHjINmaEvPOa_of7ms/nYgXVMgP7Inw9QFQsLO-Dc4oxs4\"",
      "actor": {
        "callerType": "USER",
        "email": "donal@tines.io",
        "profileId": "116204564155189261560"
      },
      "ipAddress": "37.228.209.228",
      "events": [
        {
          "type": "password_change",
          "name": "password_edit"
        }
      ]
    },
    "headers": {
      ...
    }
  }
}
In the Story workflow, we also chose to send an email to the “actor” asking if this was indeed them. We could take any Action we decide upon using predefined templates or by using fresh Actions to talk to any RESTful endpoint you require. The email contains a “prompt” widget to ask the user if it was them. If it was not them, they should click the link, which continues our workflow.
Tines: Email to a user to confirm or deny whether the recent account change was them.
Let’s say it wasn’t us, and we click the link! This continues the workflow below and emits a new event that we can match to determine what further additional steps to perform.
We now use another Action type called “Send To Story” to initiate a modular sub-Story called “STS Initiate Incident Response.” This additional Story could be anything from creating an incident in a case management system to automated threat hunting.
Wrap up
We’ve seen how to use server-to-server communications to subscribe to G Suite / Google Workspace event channels. If you want to stop watching a channel, you just need to POST the channel ID and resourceID to the “stop” endpoint (detailed here). There are many more endpoints you can watch as long as you have the right access to the required scopes. The Story above is only a brief introduction to the flexibility and extensibility of building Story workflows using Tines. The above Story can be downloaded here to give you a headstart. You can, of course, construct or modify any Story to suit your own needs, processes, or Standard Operating Procedures (SOPs); why not give it a go?