Introduction
Using Tines to automate interaction with AWS services requires the use of an AWS credential. When a HTTP Request Action with an AWS mode credential runs, Tines will authorize the request AWS using the Signature Version 4 Signing Process and include the corresponding headers in the request.
Creating an AWS credential
Role-based access
AWS recommends using roles for cross account access - e.g. to allow Tines to access resources in your AWS account. To create a Role-based access AWS credential in Tines, you'll also need to create and correctly configure a Role in your AWS account. The following three steps will get you up and running. For more information, see the AWS tutorial.
Role-based access is not available on self-hosted environments.
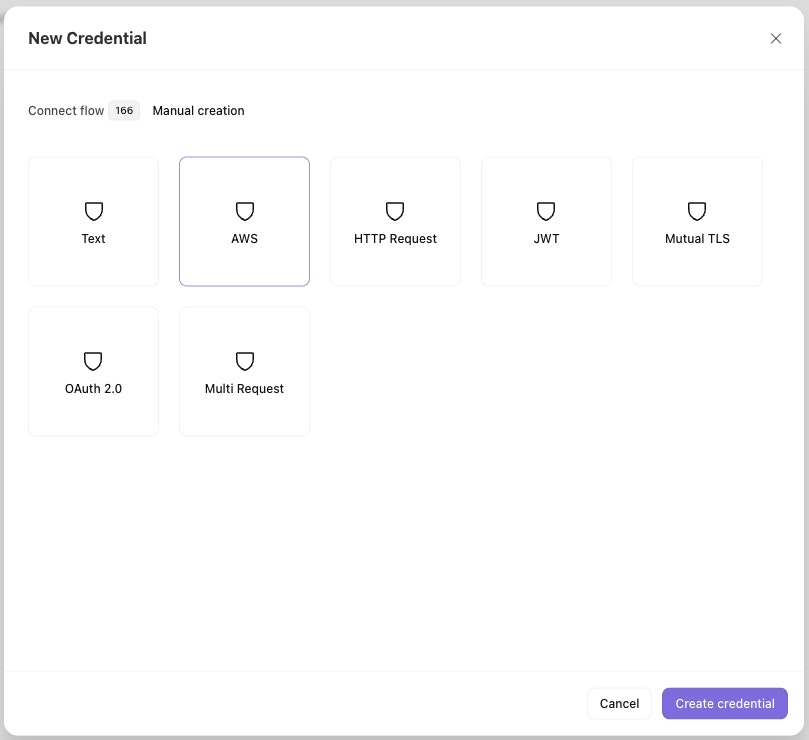
Step 1: Create your AWS Credential in Tines
Create a new Credential in Tines. Select "Manual creation" then select the "AWS" option.
Set the "Authentication type" to "Role-based access" and enter a name (and, optionally, a description).
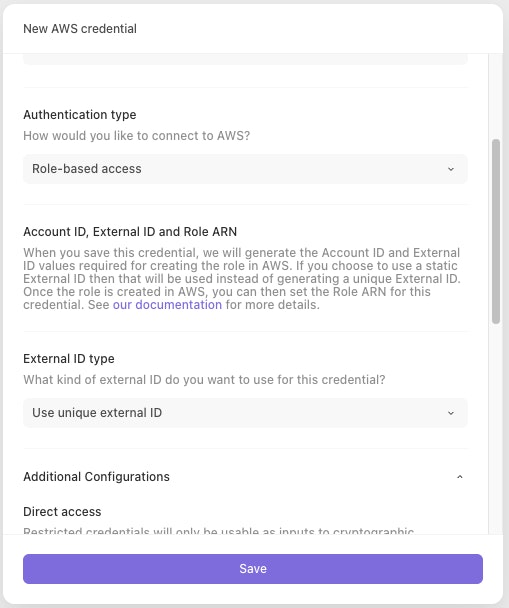
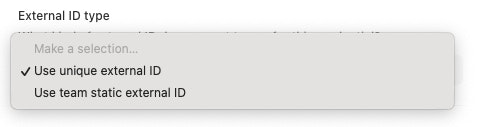
You can also choose whether to use a unique generated external ID or to use a team-scoped static external ID. If a team-scoped static external ID does not already exist then one will be generated.
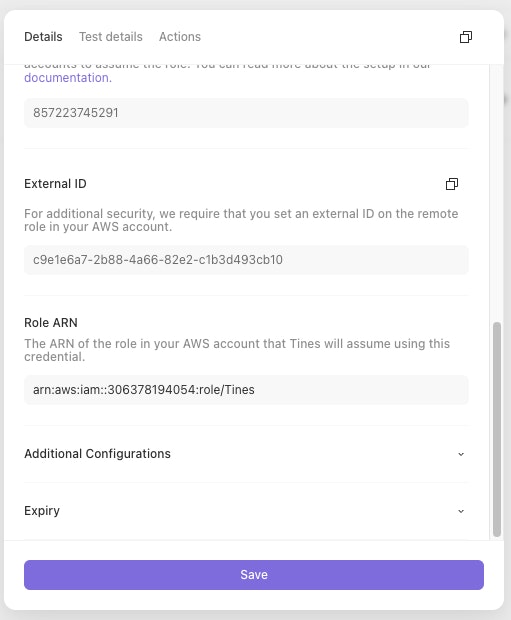
Once you click "Save credential", you'll be presented with an Account ID and External ID:
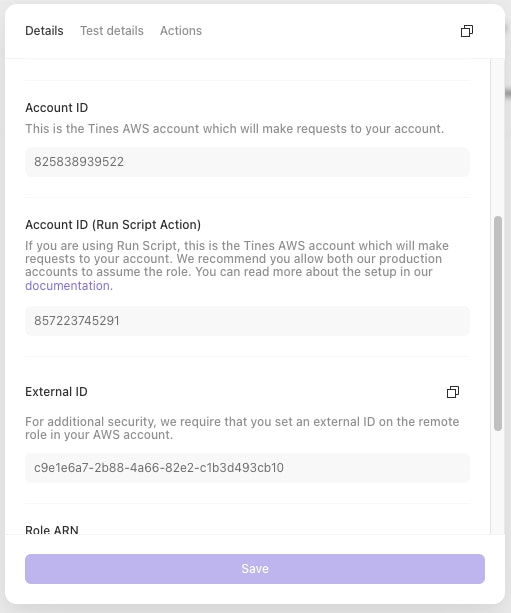
You'll need these values in the next step.
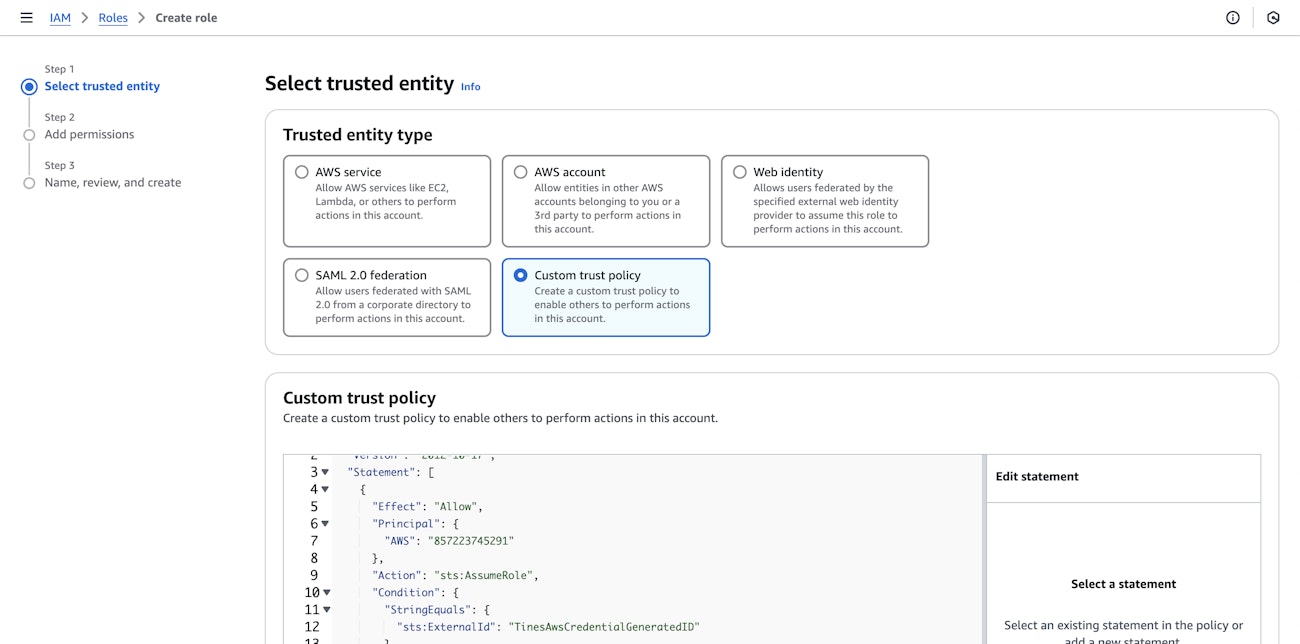
Step 2: Create your Role in AWS
From the Identity and Access Management (IAM) section of the AWS console, navigate to "Roles" and click on "Create role":

For "Trusted entity type", select "Custom Trust Policy" and copy-paste the following trust policy, giving the two Tines AWS accounts permission to assume this role, using the External ID from step 1.
{
  "Version": "2012-10-17",
  "Statement": [
    {
      "Effect": "Allow",
      "Principal": {
        "AWS": "857223745291"
      },
      "Action": "sts:AssumeRole",
      "Condition": {
        "StringEquals": {
          "sts:ExternalId": "ExternalId"
        }
      }
    },
    {
      "Effect": "Allow",
      "Principal": {
        "AWS": "825838939522"
      },
      "Action": "sts:AssumeRole",
      "Condition": {
        "StringEquals": {
          "sts:ExternalId": "ExternalId"
        }
      }
    }
  ]
}
Complete the "Add permissions" and "Name, review and create" steps to finish creating your Role.
Step 3: Add your Role's ARN to your Tines Credential
In the AWS console, open the Role you just created and copy the ARN:
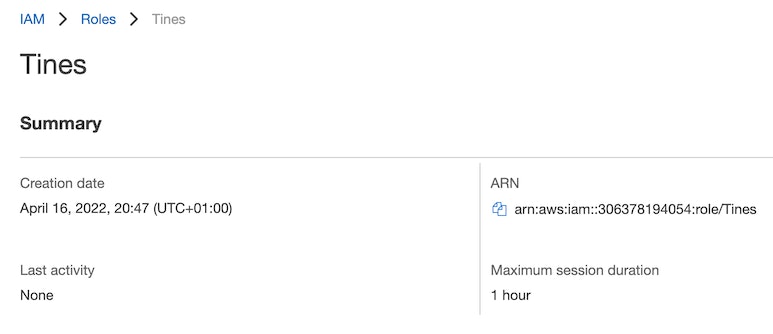
Paste it into the Role ARN field of your Credential in Tines and click "Save credential":
Static External IDs
By default, a new and unique external ID is generated for each AWS credential created. More information on external IDs can be found in the AWS docs. Optionally when creating a role-based access AWS credential you can opt to use a static external ID that is scoped to a team. Each credential in the team that uses this option will have the same external ID.
If you need to rotate a static external ID you can use the destroy static external ID API endpoint which will delete the current static external ID for that team. A new one can be generated by creating a new AWS credential that uses the static external ID option. Previously created credentials are not affected.
Key-based access
❗️Important
Enter the following information in the AWS New Credential page:
Credential name: Your desired AWS credential name.
Access key: The
access keyfrom your AWS Security Credentials.Access secret: The
access secretfrom your AWS Security Credentials.
If you want to assume a role before performing the action, you can set values for the following fields.
Assumed Role ARN: The ARN of the role you wish to assume, e.g.:
arn:aws:iam::123456789012:role/write-access-role
Tines will request a session with the minimum duration (15 minutes).
Bedrock API key
To authenticate with AWS Bedrock using an API key, select Bedrock API key as the authentication type.
Enter the following information in the AWS New Credential page
Credential name: Your desired AWS credential name.
API key: Your Bedrock API key.
This will be used for bearer token authentication.
For more details on Bedrock API keys, see the AWS documentation
Using an AWS credential with a HTTP Request Action
To use an AWS credential with a HTTP Request action, include a CREDENTIAL formula expression in the action's Authorization header.
Sample AWS HTTP Request Actions
Scan a DynamoDB Table
{
  "url": "https://dynamodb.eu-west-1.amazonaws.com",
  "method": "post",
  "content_type": "json",
  "payload": {
    "TableName": "TestTable",
    "AttributesToGet": ["Id"]
  },
  "headers": {
    "Authorization": "<<CREDENTIAL.aws_dynamo_db>>",
    "X-Amz-Target": "DynamoDB_20120810.Scan"
  }
}
List Cloudtrails
{
  "url": "https://cloudtrail.us-east-1.amazonaws.com",
  "method": "get",
  "content_type": "form",
  "payload": {
    "Action": "DescribeTrails",
    "Version": "2013-11-01"
  },
  "headers": {
    "Authorization": "<<CREDENTIAL.aws_cloudtrail>>"
  }
}
List IAM Users
{
  "url": "https://iam.amazonaws.com",
  "content_type": "form",
  "method": "get",
  "payload": {
    "Action": "ListUsers",
    "Version": "2010-05-08"
  },
  "headers": {
    "Authorization": "<<CREDENTIAL.aws_iam>>"
  }
}