

A risk register is used by Governance, Risk, and Compliance (GRC) teams to manage risk for an organisation. Whether you’re striving for ISO or NIST compliance, or hoping to manage your risks more effectively, a register is a great tool to help you do it. So, let's look at how you can build and automate a risk register using Tines Records!
What is a risk register?
A risk register is a GRC tool used by teams to identify, assess, and manage various risks within an organization. It acts as a centralized repository and looks at the impact and probability of a risk to prioritize its management. In cyber security, a risk register helps maintain compliance with various standards like the ISO 27001 Information Security Management System (ISMS), NIST SP800-30 Guide for Conducting Risk Assessments, or the new European NIS 2 directive.
Having a centralized risk register will help security teams identify and plan around potential risks. It’s important to have a realistic view of your organization's risks as even something that may appear small at first glance can have a much greater impact than expected. By investing time in risk assessments, teams should be able to prioritize their tasks and reduce the number and cost of incidents.
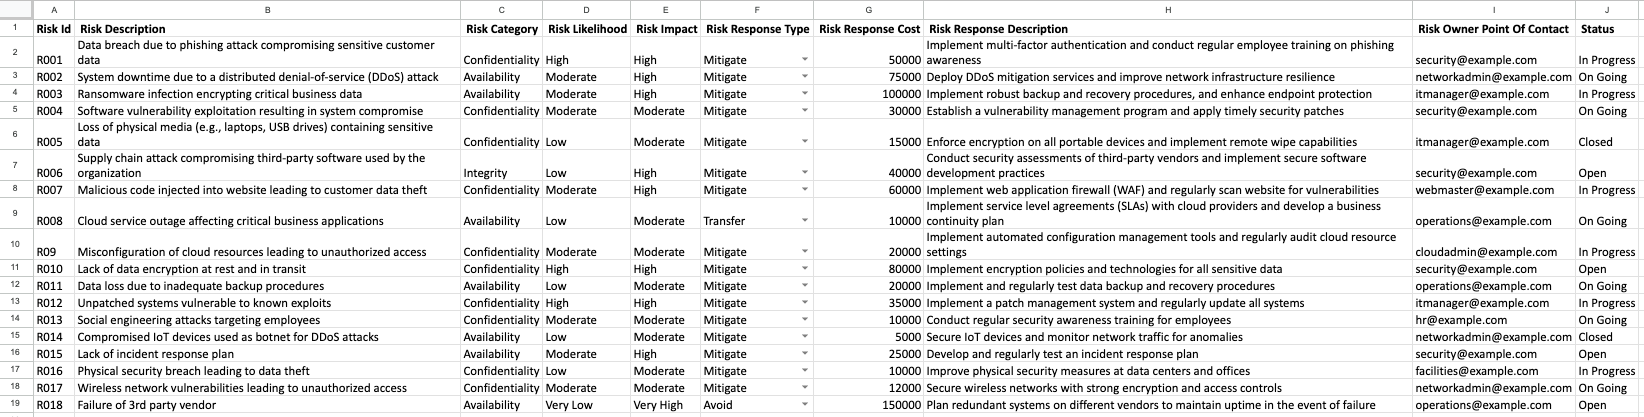
Although specialized products have been created for managing risk, many risk registers are still maintained in spreadsheets. This can be cumbersome and require manual work to update and manage. This is where Tines Records can come in.
Introducing Tines Records
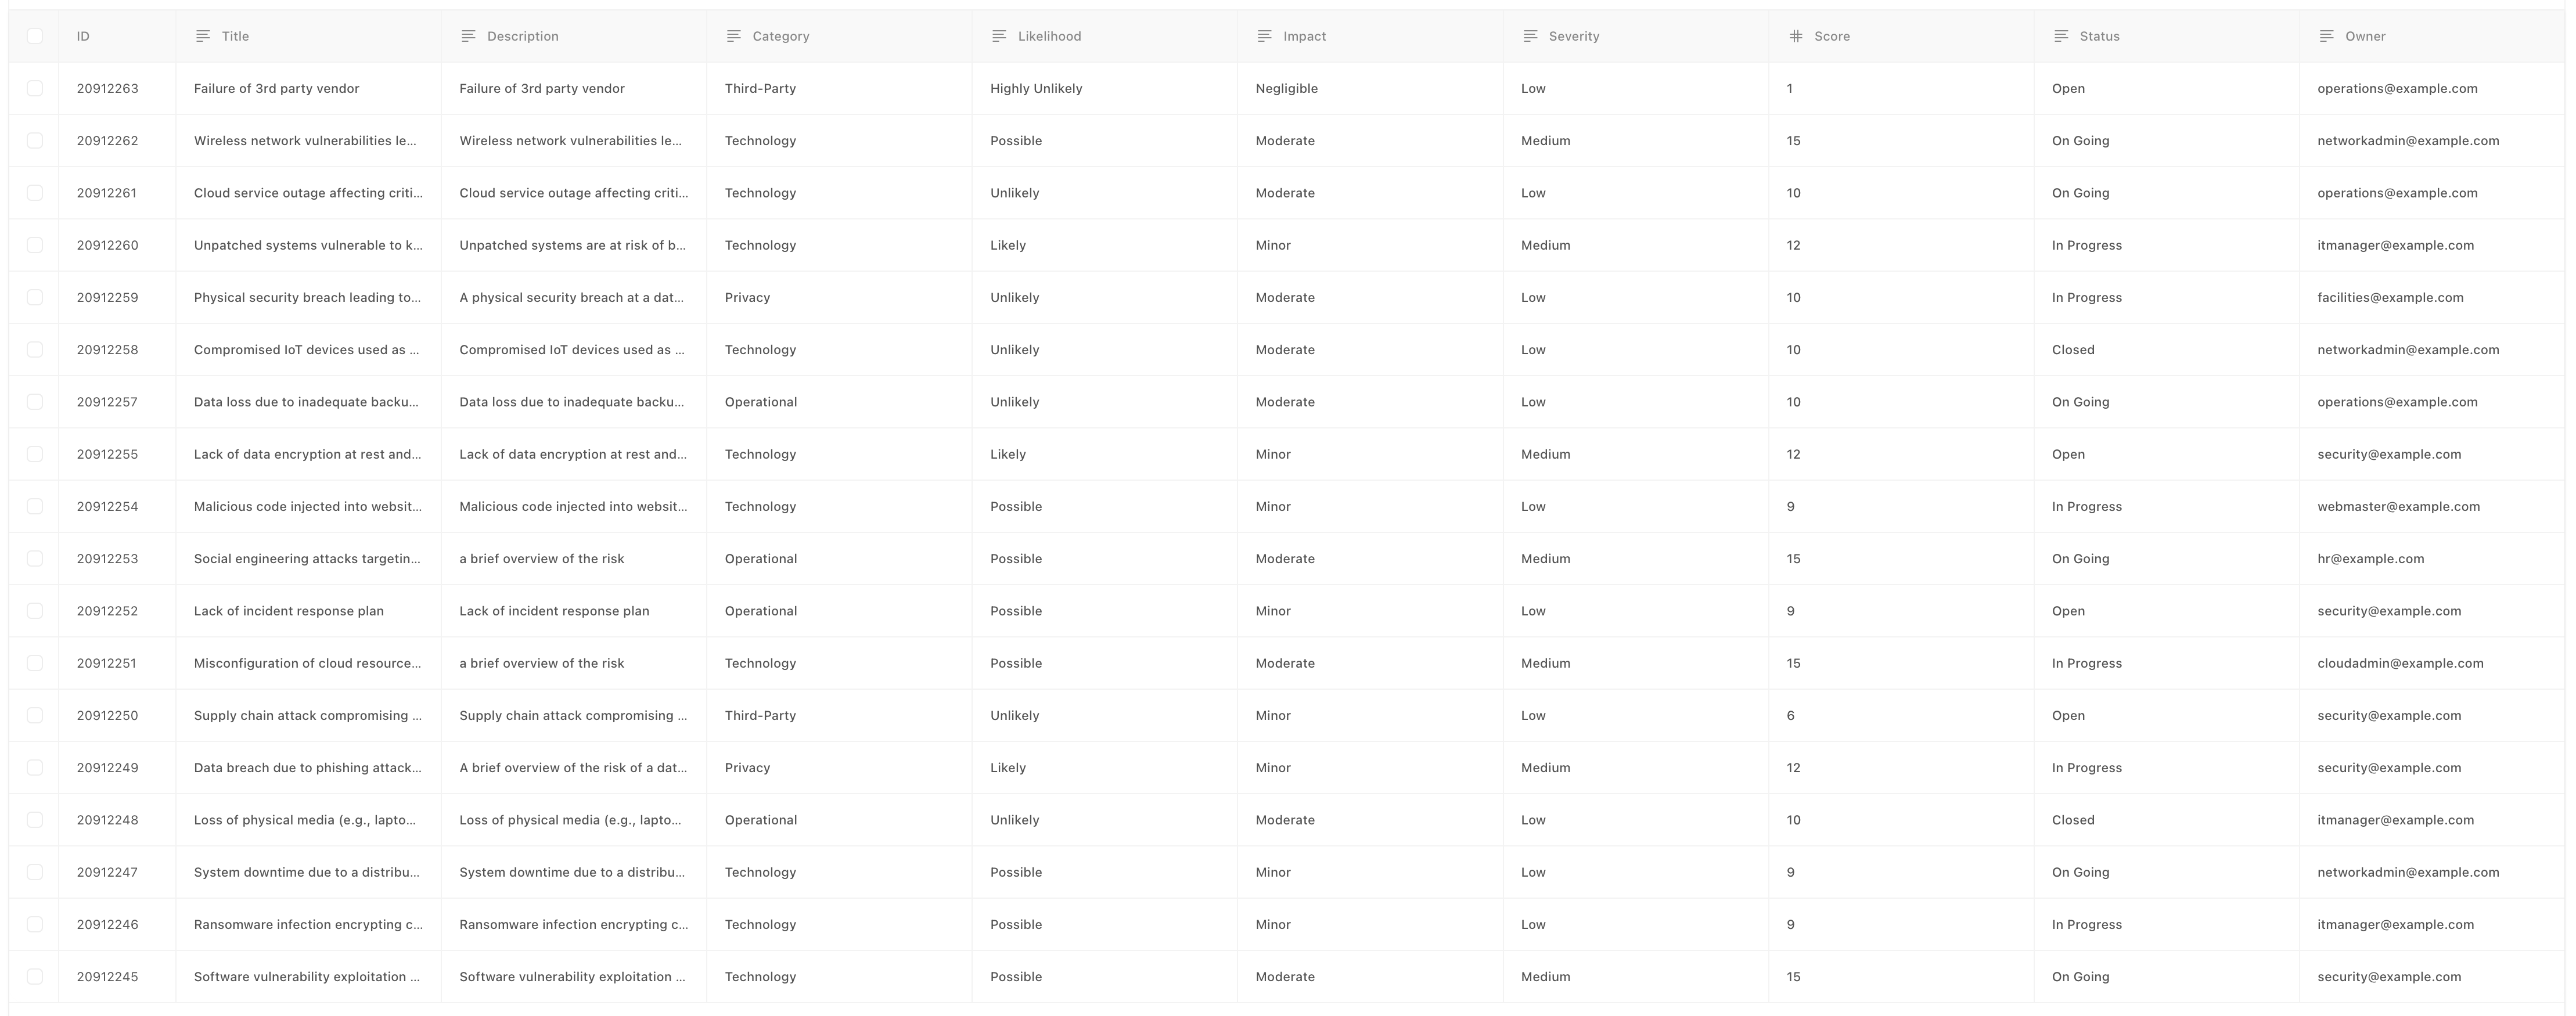
Records are a way to create structured data within Tines. They can be accessed from automated workflows (often called “stories” by Tines users) to track, store, or retrieve information. Common use cases of Records are tracking alerts/incidents, recording the results of a story, or even reporting. From here, they can be attached to a Tines case to link the data to a larger investigation. Dashboards can also be created to visualize records for trend analysis. However, in this example, we will be using it to store and manage our risk register.
Registering your layout
Before starting to build anything in Tines, we must first plan out what we’re trying to achieve. Each risk should contain a description, a way to rank or prioritize the risk, and the owner of the risk. Other fields may include categorization of the risk, or the response to a risk. In this example, we’ve identified the following fields:
Risk ID - A unique identifier to reference a risk. Every record in Tines has a unique ID and this can be used for the record identifier.
Title - A short overview of the risk used for quick reference.
Description - A brief overview of the risk. This should be the specific details of the risk referenced by the title.
Category - The main classification of the risk. This is used to subdivide the risks by business area. The categories chosen for this list are taken from Accenture Risk Study 2024 risk platform:
Compliance
Environmental
Financial
Fraud
Geopolitical
Operational
Privacy
Strategic
Technology
Third-Party
Impact - How serious the consequences are if the risk is realized. If using a risk equation, these must have a numerical form:
Severe
Significant
Moderate
Minor
Negligible
Likelihood - The probability of the risk occurring. If using a risk equation, these must have a numerical form:
Highly Likely
Likely
Possible
Unlikely
Highly Unlikely
Score - The risk score assigned to the risk. This is calculated by multiplying the Impact and Likelihood scores.
Severity - The overall priority class assigned to the risk. This can be calculated from the risk score, or using a risk matrix:
Critical
High
Medium
Low
Owner - Who is responsible for the associated risk. In this example, we use the owner's email.
Status - The current status of a given risk:
Open
In Progress
On Going
Closed
Scoring our risks
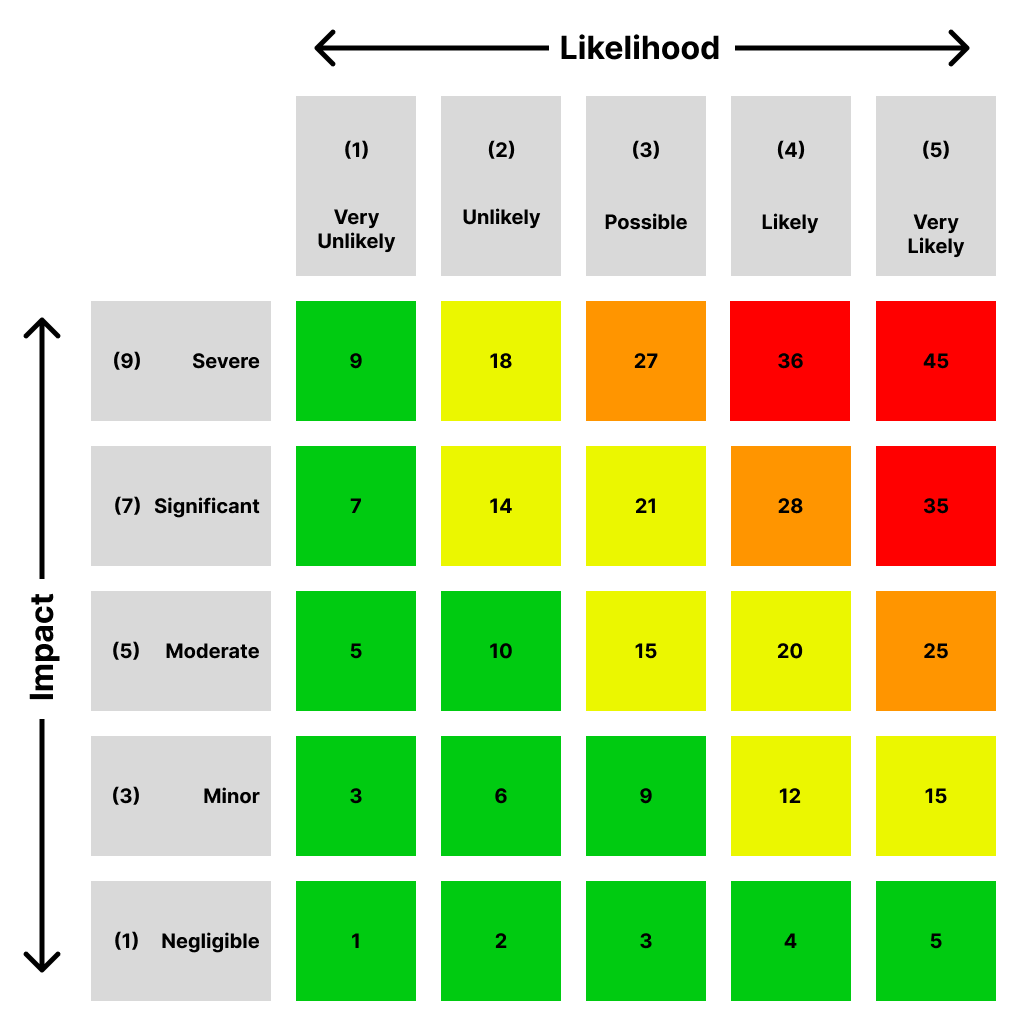
As you can see from the above table, we’re going to need a way of calculating the severity score from the impact and likelihood fields. A risk matrix is a recommended form of calculating this score. This is a grid with one axis for the impact scores and the other axis for the likelihood scores. The severity of a risk is found by locating where a given impact and likelihood cross on the matrix.
However, in this example, mathematical formulas are used to calculate the risk severity. This is completed by assigning a numerical value to all likelihood and impact scores. These values can then be multiplied by each other to give the risk score. Finally, the risk scores can be converted into the risk severity categories based on their values. Using the formulas below, we can see how this automation calculates the risk severities. The benefit of this is that it allows anyone to easily customize their matrix and risk scores to suit their needs.
Risk matrix set definitions
To do this, we first need to convert our Impact and Likelihood categorical values into numerical data. This is done using a mapping dictionary.
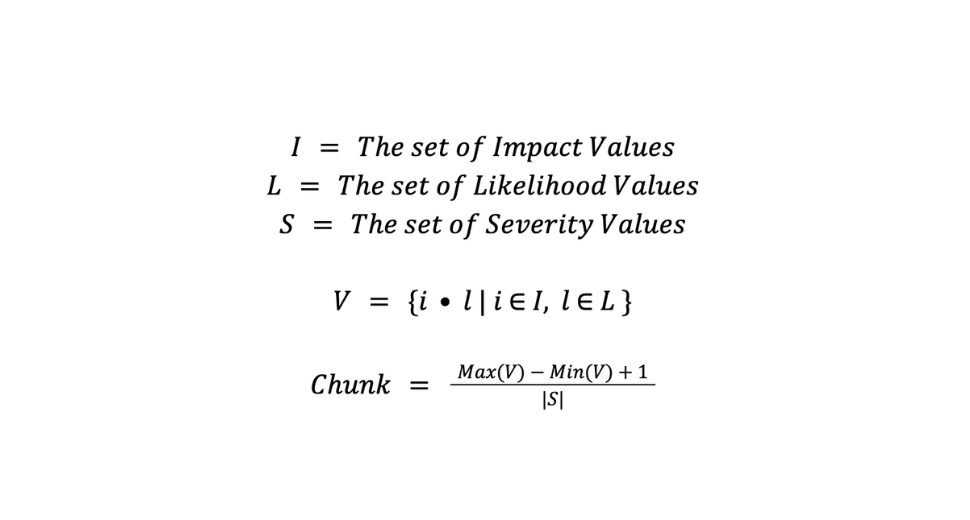
We then need to find the range of values we can have. This is done by retrieving the largest and smallest values possible when multiplying the impact and likelihood scores by each other.
Finally, if we divide the range of possible values by the number of possible severity values, this gives us our chunk value.
The chunk will be the number of severity scores that apply to each severity value. This will give us an even spread among our values.
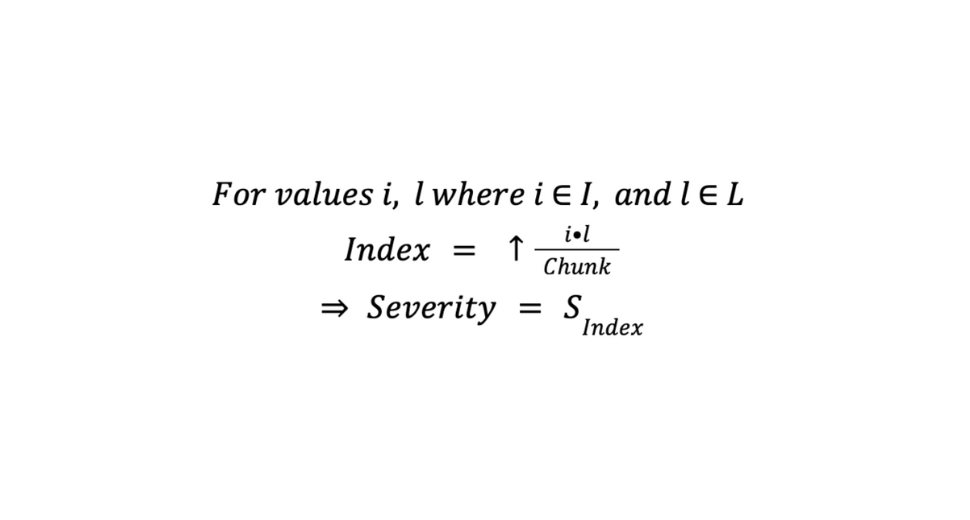
Once we have our chunk value, we can easily identify our severity.
By multiplying our Impact and Likelihood scores, we get our Severity Score.
By dividing our Severity score by our chunk value and rounding up, this gives us the index of our Severity Value.
The benefit of this approach is that we can weight our Impact or Likelihood scores by changing their mapped value. We can also easily add or remove severity values, and Tines can adjust our calculations.
Benching out some automation
Now that we have our risk register, it’s time to start automating. Since we have already created a workflow to create a risk on our register using what we have discussed above, what are some other tasks we can automate? Some simple ideas include:
Creating new incidents related to risks
Generating risk reports and dashboards
Notifying and reminding users of outstanding risks
Triggering automated remediation or workflows
Risky incidents
In order to show adherence to company policies, it’s essential to collect evidence of compliance. This can be done using Tines Cases. When non-compliance is detected or risk-related alerts are discovered, cases can be created and linked back to the associated risk. This will allow links to these cases to be seen on the risk register as well as being accessible. This can be used to ensure these risks are being handled correctly and to a required standard.
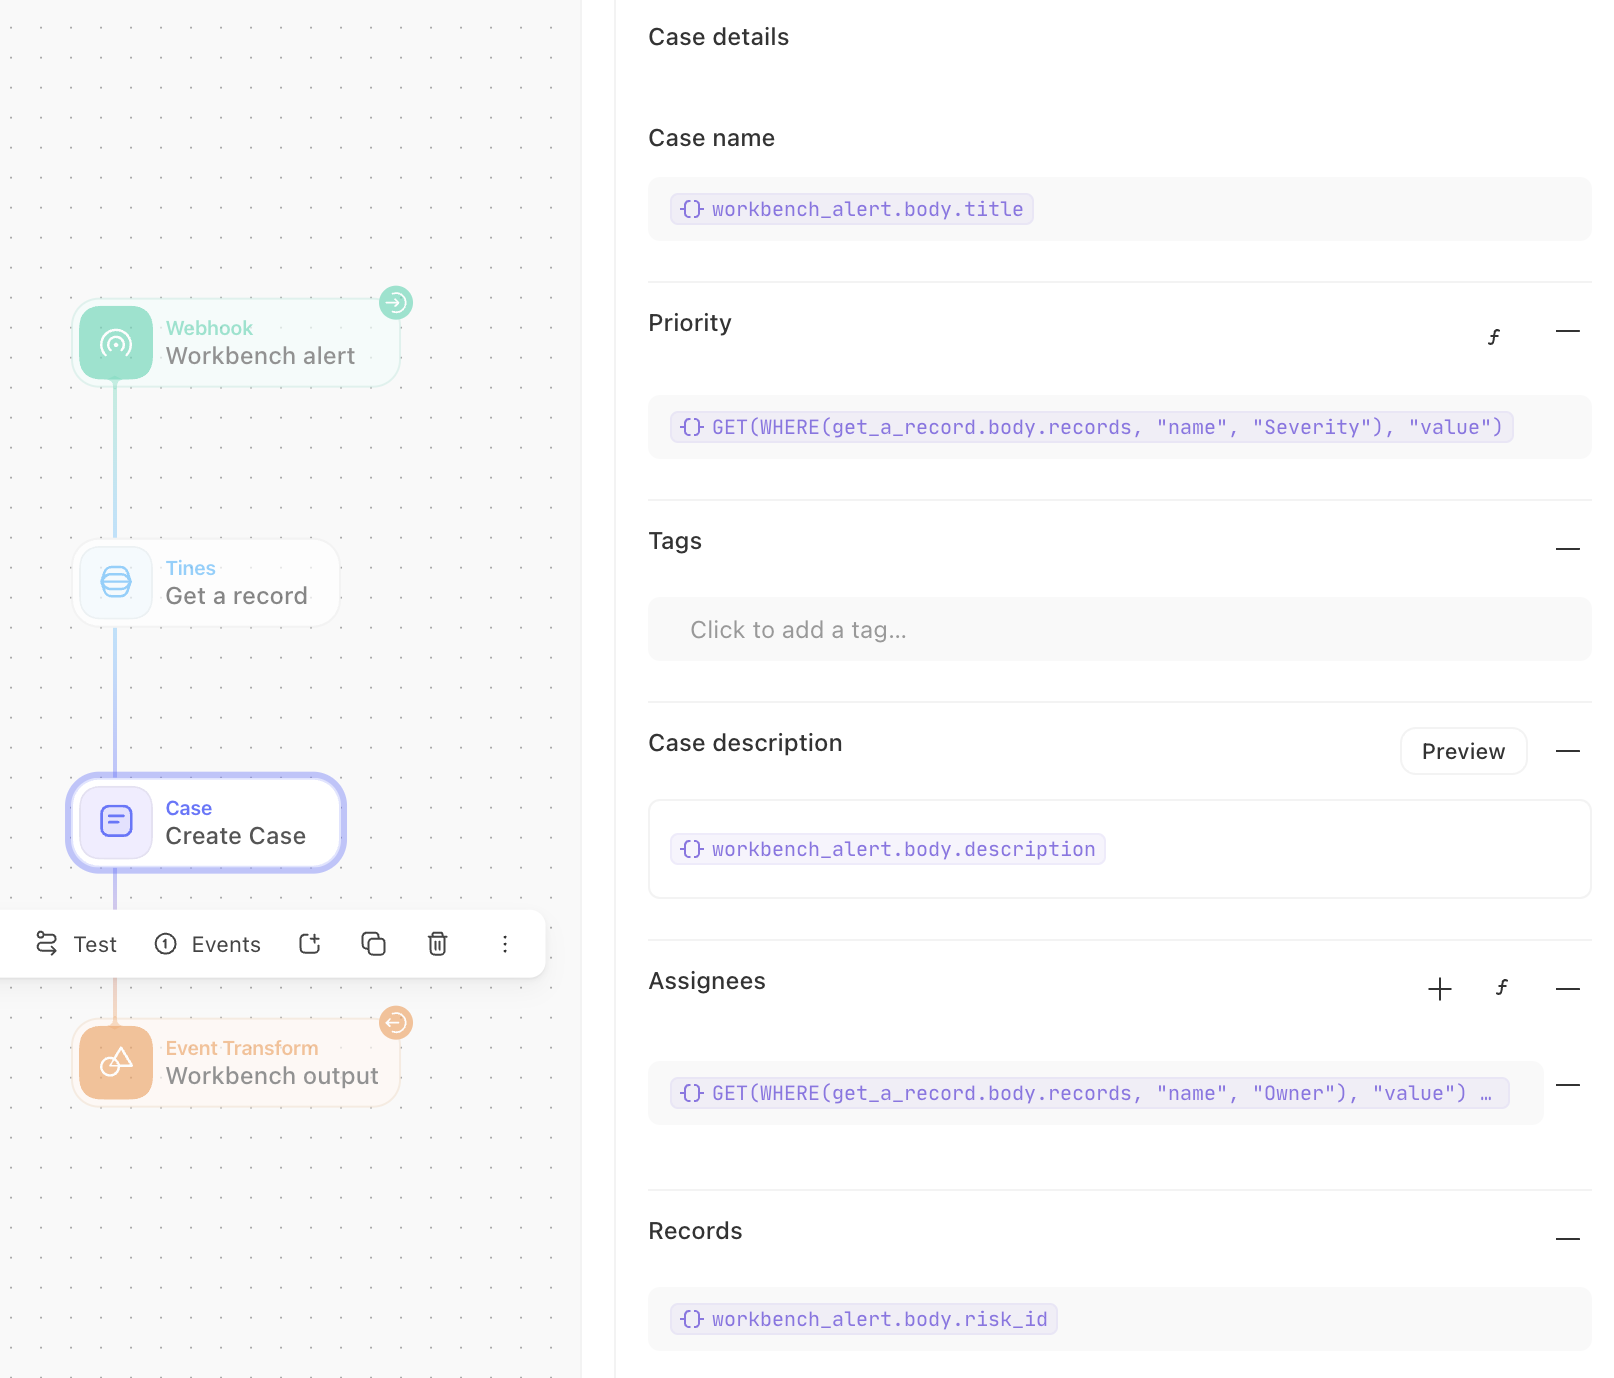
Using Workbench, we can create a risk incident with a Tines story. Create Tines case from the Risk Register is an example of such a story. This will take details from an incident and a risk ID from the register, create a new Tines case, and attach it to the risk record. It will also use the risk owner and severity to assign the case to a relevant person and set the severity of the risk. From here, further automation can be used to start remediation or actions on the case if it relates to specific risks.
Dashboarding and reporting
Another key component of GRC is the reporting to upper management. This lets security teams highlight the current risk posture of the company, as well as the effectiveness of the current security measures. Creating dashboards and reports will illustrate risk trends over time and help identify potential problems before they become issues.
Using Tines, dashboards can be created natively in the product. These can be used from both Records and Cases, allowing users to see a quick overview of their current GRC status. Furthermore, automations can be built to create pre-generated reports or send alerts if certain conditions are met. This could include breaches of SLAs or issues relating to the number of open risks or cases exceeding a tolerated threshold.

Where should I start?
If you’re thinking about automating your risk register, the first step is to look at your current solution. Identify the problems with how you’re currently managing your risks and what benefits change might deliver. This is to isolate any bad habits or tedious processes. You can then look at building your process in Tines.
If you already have a risk register, a story like Sync Google spreadsheet to records can be used to migrate your risks into Tines records. The cybersecurity community thrives on collaboration, so be sure to help others improve by submitting your stories to our library.
Learn more about Tines Records by browsing our library of pre-built workflows